Concrete Subfloor Preparation: What Actually Needs to Happen Before Self-Leveler
The self-leveling compound sits in the bucket. The concrete floor waits. And between these two things—between the product and the surface—exists a gap that determines whether you're creating a floor or creating an expensive problem that reveals itself three months later when the leveler delaminates in sheets.
The marketing materials show smooth pours creating perfect floors. The product data sheets list coverage rates and cure times. But there's this vast space of information that exists between "buy the product" and "pour the product"—the preparation work that nobody wants to talk about because it's tedious, time-consuming, and absolutely non-negotiable if the leveler is going to stay bonded to the concrete underneath.
Floor coating contractors track this data obsessively because preparation failures are expensive. A leveler that delaminates requires complete removal and reinstallation—double the labor, double the materials, and a timeline that pushes every subsequent trade backward. The data from these failures reveals exactly what happens when specific preparation steps get skipped, and more importantly, when they can be skipped safely versus when they can't.
The Surface Profile Reality
Concrete surfaces aren't smooth at the microscopic level—they're landscapes of peaks and valleys created during finishing. Self-leveling compound bonds through mechanical grip: the liquid flows into surface irregularities, cures, and locks in place. The depth and density of these irregularities determine bond strength.
The industry quantifies this using Concrete Surface Profile (CSP) ratings, scaled 1-10. CSP-1 is nearly smooth (like polished concrete). CSP-10 is heavily profiled (like after aggressive scarification). Self-leveling compounds require CSP-2 to CSP-4 for adequate bond—enough texture for mechanical grip without so much texture that it creates voids or excessive material consumption.
Power-troweled concrete (what most interior slabs receive during initial finishing) typically measures CSP-1 to CSP-2. The surface is too smooth for reliable leveler bonding. Field testing data from flooring contractors shows delamination rates approaching 40-60% when leveler goes directly onto power-troweled concrete without surface preparation. The bond initially seems fine—the leveler cures, it's walkable, it looks good. Then foot traffic, thermal cycling, and minor substrate movement create stress at the bond line, and the insufficient mechanical grip fails.
The timeline of this failure follows a pattern: weeks 1-4 show no issues, weeks 5-8 show hollow spots developing (detectable by tapping—the sound changes from solid to hollow), months 3-6 show visible delamination starting at edges and high-traffic areas, months 6-12 show extensive failure requiring removal. The failure isn't immediate enough to catch during installation but appears soon enough to create warranty claims and costly repairs.
Creating adequate surface profile requires mechanical abrasion. The methods vary:
Grinding uses rotating diamond discs that remove the surface cream (the fine cement paste at the concrete surface) and expose aggregate. A concrete grinder creating CSP-2 to CSP-3 profile removes approximately 1/16" of material and leaves a uniform textured surface. The process generates significant dust (requiring HEPA-filtered vacuums) and takes approximately 200-400 square feet per hour depending on concrete hardness. Rental equipment costs $75-150 per day. The resulting profile provides excellent bond surface for leveling compounds.
Shot blasting propels steel shot at the surface, removing cream and creating profile through impact. The equipment recycles the shot while collecting debris. Shot blasting is faster than grinding (400-800 square feet per hour) and creates very consistent CSP profiles. However, rental equipment is expensive ($200-400 per day) and heavier (800+ pounds), limiting accessibility to upper floors or areas without freight elevators. Commercial contractors use shot blasting extensively. Residential applications more often use grinding due to equipment accessibility.
Scarifying uses rotating cutter heads with carbide or steel teeth. It's more aggressive than grinding, quickly achieving CSP-3 to CSP-5 profiles. The aggressive action makes it suitable for removing coatings or heavily damaged concrete but creates deeper texture than most leveling applications need. Scarifiers see use primarily when significant material removal is required, not for standard leveler preparation.
Chemical etching uses acidic solutions (muriatic acid diluted 3:1 to 4:1 with water) to dissolve surface cement paste and expose aggregate. Application involves wetting the surface, applying acid, allowing it to react (visible fizzing), then neutralizing with water. Chemical etching creates CSP-1 to CSP-2 profiles—less aggressive than mechanical methods. The approach works for small areas or situations where mechanical equipment isn't accessible, but it's slower (requires multiple applications for adequate profile), creates disposal challenges (neutralized acid solution requires proper disposal), and produces inconsistent results (hard aggregate doesn't etch, soft paste does, creating uneven profile). Field data shows higher delamination rates with acid-etched surfaces compared to mechanically prepared surfaces—chemical etching alone rarely creates sufficient profile for reliable bonding.
The preparation method matters less than achieving the target CSP range. A concrete surface measuring CSP-2 to CSP-4 (verifiable using CSP profile chips—physical reference standards showing what each profile level looks like) provides adequate bond regardless of which mechanical method created it. Surfaces below CSP-2 show elevated delamination risk. Surfaces above CSP-4 consume excess leveling compound (the deeper texture requires more material to fill) without improving bond strength.
One critical note: new concrete (less than 28 days old) typically doesn't require profile creation—it hasn't been power-troweled smooth and often already measures CSP-2 or higher. However, it faces different challenges related to moisture and cure state that affect leveler bonding separately from surface profile concerns.
Contamination Removal Patterns
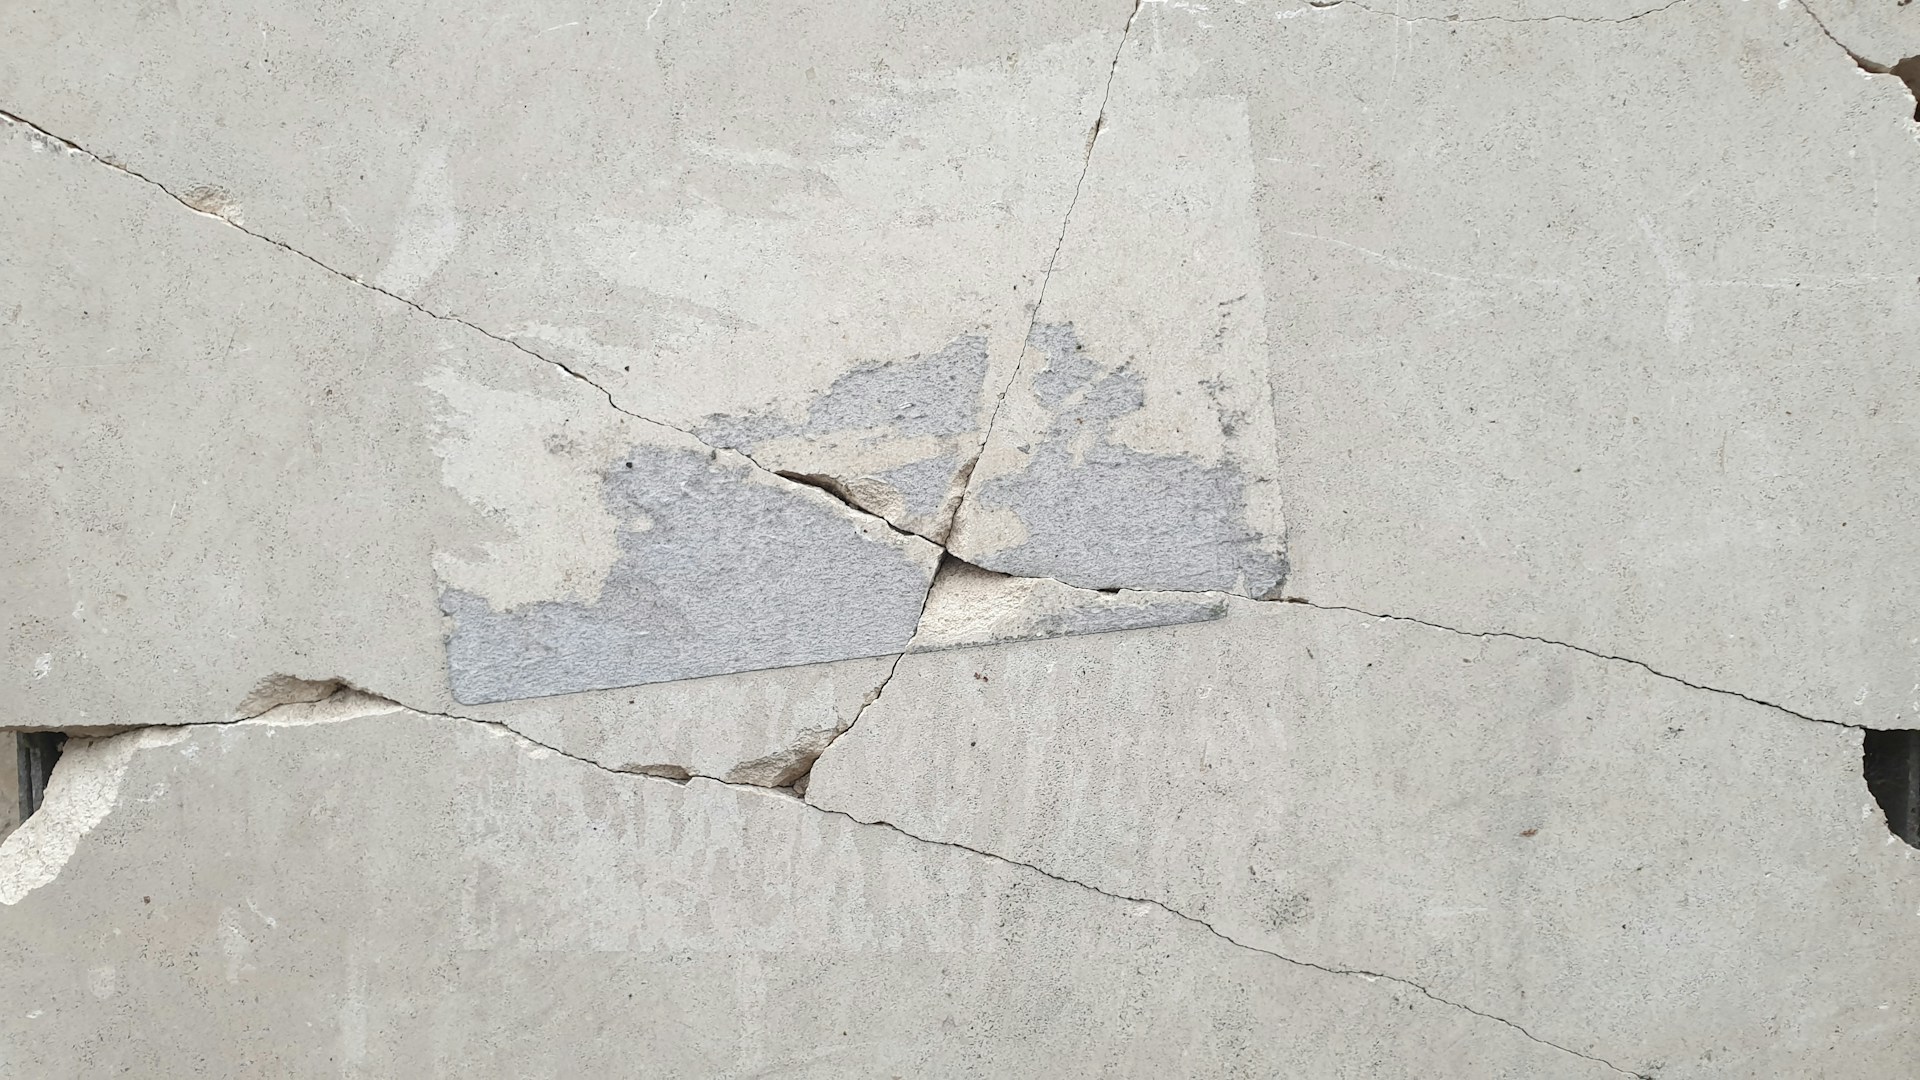
Concrete surfaces accumulate materials that prevent leveler bonding: curing compounds, sealers, oils, adhesives, paint, and general construction debris. These contaminants create a barrier between the leveler and concrete—perfect surface profile underneath doesn't matter if something sits between them preventing contact.
The failure mechanism is straightforward: leveler bonds to the contamination layer, not the concrete. The contamination-to-concrete bond becomes the weak point. Even minor contamination causes problems—a thin film of curing compound (nearly invisible to casual inspection) creates enough bond interference to cause delamination.
Curing compounds represent the most common contamination issue. Concrete receives curing compound application immediately after finishing to slow moisture loss and improve cure quality. The compound (typically wax-based or resin-based) forms a film on the surface. This film must be removed before leveling. Testing for curing compound presence: water droplets beaded on the surface indicate contamination (clean concrete absorbs water). Field testing shows that curing compounds, even when invisible, cause delamination in 70-80% of cases when not removed.
Removal methods depend on compound type. Wax-based compounds respond to chemical strippers (available from concrete supply houses) or mechanical removal (grinding). Resin-based compounds require grinding—chemical removal is incomplete. The complete removal verification: water no longer beads, it absorbs into concrete creating dark spots.
Sealers (applied to finished concrete for protection or appearance) create similar bonding barriers. Acrylic sealers can sometimes be removed chemically. Epoxy and polyurethane sealers require mechanical removal—grinding or scarifying. The verification method remains the same: water absorption testing.
Oils and greases (from vehicles, equipment, or construction) penetrate concrete beyond just surface film. Surface cleaning removes visible oil but doesn't address penetration. The approach: aggressive degreasing with industrial degreasers (alkaline cleaners at commercial concentrations), mechanical scrubbing, hot water rinsing, then verification via water absorption testing. Heavily oil-contaminated concrete (like automotive shop floors) may require grinding to remove the contaminated surface layer—chemical cleaning alone rarely achieves adequate cleanliness for leveler bonding.
Adhesives from previous flooring (carpet glue, tile mastic, VCT adhesive) require mechanical removal. Chemical adhesive removers partially dissolve adhesive but leave residue that interferes with leveler bonding. The reliable approach: grinding off all adhesive residue until clean concrete appears. This is tedious, time-consuming work. Contractors report that adhesive removal often takes longer than the actual leveling process. There's no shortcut—incomplete adhesive removal causes delamination at every adhesive spot.
Paint and coatings require assessment of bond strength. Well-bonded paint (no peeling, no blistering) that passes a "scratch test" (can't be easily scraped off with a putty knife) can sometimes be leveled over if properly primed. Poorly bonded paint requires removal—it will delaminate, taking the leveler with it. The conservative approach: remove all paint before leveling. The risk-tolerant approach: prime over well-bonded paint and accept slightly elevated failure risk.
The contamination assessment process: inspect the entire floor systematically, test water absorption across the space, identify areas that bead water (contaminated), and mark them for remediation. The goal isn't perfection—it's consistent cleanness across the entire surface. Patches of clean concrete next to contaminated areas create differential bonding that leads to localized failures.
Cleaning verification matters as much as the cleaning itself. The water droplet test provides immediate feedback: clean concrete absorbs water within 10-30 seconds. Contaminated concrete beads water that sits on the surface. This test costs nothing and reliably indicates bonding readiness. Floor coating contractors use it constantly during preparation because it quickly identifies areas needing additional cleaning.
Crack Assessment and Treatment
Concrete cracks. Foundation settlement, shrinkage during cure, thermal expansion/contraction, and structural loading all create cracks. Self-leveling compound flows into cracks but doesn't bond to crack edges strongly enough to prevent the crack from telegraphing (showing through) the leveler layer. Worse, moving cracks (those that open and close with temperature or loading) can crack the leveler or cause it to delaminate.
The crack treatment approach depends on crack characteristics:
Hairline cracks (under 1/16" wide, non-moving) typically don't require treatment before leveling. The leveler flows in, fills them, and bonds adequately to both crack edges. These cracks rarely telegraph through leveler layers under 1/4" thick. Contractors generally ignore hairline cracks during leveler preparation—treating them takes time without improving outcomes.
Small to medium cracks (1/16" to 1/4" wide, non-moving) require filling before leveling to prevent telegraphing. The standard treatment: epoxy or polyurethane crack filler injected or troweled into the crack, then ground flush with the surrounding surface. The filled crack now acts like solid concrete—the leveler bonds to the crack filler and surrounding concrete uniformly. Failure to fill these cracks: they telegraph through the leveler within weeks to months, appearing as visible lines or shallow depressions in the finished floor.
Large cracks (over 1/4" wide) and moving cracks (any width, but showing signs of movement—clean edges, no dirt accumulation, or cracks that run to building expansion joints) require different approaches. Large non-moving cracks need routing (widening with a grinder to create a V-groove), filling with flexible polyurethane filler, then covering with crack isolation membrane before leveling. Moving cracks shouldn't be leveled over—they need isolation. The approach: install crack isolation membrane over the crack, which allows crack movement without transmitting stress to the leveler above.
Structural cracks (those indicating foundation problems—wide cracks with vertical offset, cracks with pattern suggesting foundation failure, cracks that continue growing) shouldn't be covered with leveler at all. These cracks indicate problems that need structural resolution. Leveling over them hides the symptom without addressing the cause, and the structural movement will destroy the leveler installation. The correct sequence: resolve the structural issue first, then assess whether leveling is still needed.
Crack treatment verification: after filling and grinding flush, the crack area should be level with surrounding concrete (check with a straightedge), the filler should be fully cured (follow manufacturer cure times), and the crack area should pass the same water absorption test as the rest of the floor (indicating the filler isn't preventing proper surface preparation over the crack).
The data from flooring contractors shows that untreated cracks over 1/16" wide telegraph through leveler in approximately 80% of installations. Treatment reduces this to under 10%. The time investment in crack filling—typically 15-30 minutes per linear foot of crack—prevents problems that take hours to repair after the leveler is down.
Moisture Testing Requirements
Concrete contains moisture. New concrete starts saturated and dries over time. Existing concrete absorbs moisture from ground contact or humidity. Excess moisture in concrete causes self-leveling compound failure through multiple mechanisms: it prevents proper bond formation, it can cause the leveler to effervesce (bubble) during cure, and it can lead to delayed delamination as moisture tries to escape through the leveler layer.
The industry standard: concrete must be below 3 pounds per 1,000 square feet per 24 hours moisture emission (measured by calcium chloride test) or below 75% relative humidity (measured by in-situ probe) before leveling. Above these thresholds, bond failure becomes likely.
Calcium chloride testing (ASTM F1869) places a measured amount of calcium chloride salt in a sealed dome on the concrete surface for 60-72 hours. The salt absorbs moisture vapor rising from the concrete. Pre- and post-test weighing determines moisture emission rate. The test costs $15-30 per location (3-4 locations per 1,000 square feet is standard). Results come back in 3 days.
Relative humidity testing (ASTM F2170) drills holes 40% into the concrete depth, inserts RH probes, allows them to equilibrate for 24-72 hours, then reads the RH percentage. This test measures moisture deeper in the slab, providing better prediction of long-term moisture issues. The test costs $300-500 for a reusable probe kit, or $15-25 per disposable probe. Results come immediately after equilibration.
The moisture test timing matters. Test too early (before completing surface preparation), and you're testing concrete that will change—grinding or scarifying removes material and can alter moisture characteristics. Test after surface preparation is complete but before primer application.
High moisture test results create a decision point: wait for the concrete to dry naturally (takes weeks to months depending on conditions), apply topical moisture barrier (adds $1-3 per square foot), or use moisture-tolerant leveling products (premium-priced and have lower compressive strength than standard levelers). None of these are ideal solutions—they're responses to an existing moisture problem.
The failure timeline with excess moisture: leveler may appear to cure normally, but over weeks to months, moisture trying to escape causes blistering, delamination, or in extreme cases, complete bond failure across large areas. Moisture-related failures tend to be extensive (not localized) because moisture issues usually affect entire slabs or large sections.
Prevention beats remediation: concrete moisture testing before purchasing leveling materials saves the cost of failed installations. The $100-200 cost of proper moisture testing is insurance against $1,000s in failed leveling work.
Primer Application Reality
Primers serve multiple functions: they seal porous concrete (preventing the concrete from absorbing moisture from the leveler too quickly), they improve bond strength, and they reduce pinholing (small air bubbles in the leveler surface). Not all leveling situations require primer, but most benefit from it.
The primer types matter:
Water-based acrylic primers are the standard for most leveling applications. They penetrate concrete pores, provide moderate bond enhancement, and work with most leveling compounds. Application: roll or spray onto prepared concrete, allow to dry to tacky state (typically 1-4 hours depending on temperature and humidity), then apply leveler. These primers work well when concrete porosity is moderate and surface preparation created good CSP profile.
Epoxy primers provide maximum bond strength and complete moisture barrier properties. They're more expensive ($30-50 per gallon versus $15-25 for acrylic) and have strict application timing—leveler must go down within the epoxy's recoat window (often 4-24 hours). Miss the window, and the primer must be sanded before leveling. Epoxy primers see use in high-stress applications (commercial floors, floors subject to heavy traffic) or when marginal moisture conditions exist.
Solvent-based primers penetrate deeply but have strong odors and VOC concerns. They're less common than they used to be due to environmental regulations. Application is similar to water-based primers. They excel at sealing very porous concrete but offer no advantages in typical applications.
The primer application sequence:
Surface must be clean and at proper profile (this means primer goes on after all grinding, cleaning, and crack repair). The concrete should be dry to the touch but moisture testing should show acceptable levels—primer doesn't fix moisture problems.
Application method matters: rolling provides good control and even coverage, spraying is faster but requires more ventilation and overspray management. Coverage rates vary by concrete porosity: dense concrete might get 400-500 square feet per gallon, porous concrete might only get 200-300 square feet per gallon.
The primer must reach the correct dry state before leveling. Too wet, and it mixes with the leveler causing bond issues. Too dry (beyond recoat window for epoxy primers), and bond strength suffers. The manufacturer's technical data sheet specifies timing—this isn't flexible. Temperature and humidity affect dry times significantly: cold or humid conditions extend dry times, hot or dry conditions shorten them.
Primer application verification: the surface should show uniform appearance (no bare spots or puddles), feel tacky to the touch (for water-based primers), and be within the specified recoat window. Walking on wet primer tracks contamination across the floor and creates areas with insufficient primer film thickness.
Skipping primer in situations where it's recommended increases delamination risk by approximately 30-40% based on contractor experience surveys. The primer cost (material plus application labor) typically represents 10-15% of the total leveling project cost—it's proportionally small compared to the risk it mitigates.
The magnesium float vs steel trowel discussion becomes relevant here because surface texture from initial concrete finishing affects primer absorption and leveler bond—steel-troweled surfaces are denser and less porous than magnesium-floated surfaces, which changes primer application requirements.
Dust and Debris Management
Surface preparation creates dust and debris: grinding generates concrete dust, cleaning creates dirty water, crack filling leaves cured material droppings. All of this must be removed before priming or leveling. Debris sitting on concrete prevents primer contact and leveler bond.
The cleaning sequence after surface preparation:
Vacuum the entire floor with industrial vacuum (shop vac adequate for small areas, HEPA-filtered vacuum required for large areas to prevent dust recirculation). This removes bulk dust and loose material. Edge details (where floor meets walls) accumulate dust—these need thorough vacuuming.
Damp mop with clean water changes the perspective: dust visible when dry becomes invisible when wet. Mopping reveals dust that vacuuming missed. The mop water should be changed when it becomes cloudy—continuing with dirty water just spreads dust around. Multiple mop passes (with clean water each time) ensures complete dust removal.
Dry completely before primer application. Wet concrete doesn't accept primer properly. Drying time depends on ventilation and humidity: good ventilation in dry conditions might need only 1-2 hours, poor ventilation in humid conditions might need 4-6 hours or overnight.
The verification: run a white cloth over the dry floor. If the cloth picks up dust, more cleaning is needed. The floor is clean enough when the cloth stays clean.
Dust contamination creates a subtle failure mode: the leveler appears to bond initially, but a microscopic dust layer between concrete and primer causes bond weakness. The failure may not appear for months—long enough to be covered by finished flooring, creating more expensive repair situations.
The time investment in thorough cleaning is small (1-2 hours for typical residential room) compared to the failure risk. Contractors who cut corners on cleaning report higher callback rates for delamination issues. Those who clean thoroughly report minimal bond failures.
The Foundation Factor
The concrete slab condition fundamentally affects leveler success. Surface preparation can't fix underlying slab problems—it can only prepare the surface that exists.
Structural integrity: spalling concrete (surface scaling and deterioration), widespread cracking suggesting structural issues, or concrete with low compressive strength (soft enough to dig into with a screwdriver) indicates problems that leveling won't solve. These conditions need concrete repair or replacement before considering leveling. Leveling over compromised concrete simply creates a thin layer over a failing substrate—the substrate failure takes the leveler with it.
Slab curl and wave: concrete slabs can curl at edges (edges higher or lower than center) or have waves across the surface. Self-leveling compound has limited thickness range (typically 1/8" to 1" depending on product). Significant slab unevenness exceeding the leveler's thickness capability means either multiple leveler applications (expensive) or addressing the slab flatness through grinding (removing high spots) before leveling. The shed foundation cost post discusses similar foundation preparation requirements—proper substrate preparation prevents problems regardless of what you're building on it.
Delaminated existing toppings: if previous leveling compound or topping exists and is delaminated, it must be removed completely. Leveling over delaminated material adds weight and stress but doesn't improve bond—the new leveler can only be as well-bonded as the material underneath it. Complete removal (grinding or chipping off the old topping) creates clean concrete for fresh installation.
Control joints and saw cuts: these intentional breaks in concrete allow movement. They'll telegraph through leveling compound—guaranteed. The options: accept the joint showing through, fill the joint with flexible filler and install crack isolation membrane over it, or plan finished flooring that accepts or hides joints (like tile with joints positioned at concrete joints). The joints exist for a reason—concrete moves, the joints accommodate movement. Trying to make them disappear with leveling compound doesn't work.
The substrate assessment happens before purchasing leveling materials. Discovering substrate problems after material purchase creates waste and delays. The assessment checklist: structural integrity (sound concrete), flatness (within leveler thickness capability), existing toppings (bonded or removed), and movement joints (identified and planned for). Problems identified during assessment get resolved before prep work begins.
Climate and Environmental Controls
Leveling compound cures through chemical reactions affected by temperature and humidity. The work environment during surface preparation and during/after leveling affects outcomes.
Temperature requirements: most leveling compounds specify 50-90°F for application and cure. Below 50°F, cure slows dramatically—products that should be walkable in 4 hours might take 12+ hours in cold conditions. Slow cure extends the vulnerability period where the installation can be damaged. Above 90°F, cure accelerates—the working time shortens, making it difficult to spread material before it begins setting.
The temperature consideration affects preparation timing: surface preparation in cold weather is fine (grinding, cleaning, crack filling all work normally), but primer application and leveling need temperature within spec. Heating the space to bring it into temperature range before priming and leveling solves cold weather issues.
Humidity effects: high humidity (above 70-80%) slows water-based leveler cure. Low humidity (below 30%) can cause too-rapid surface drying, potentially causing surface crazing (fine surface cracks). Moderate humidity (40-70%) provides optimal cure conditions.
Ventilation matters differently at different stages: during surface preparation, maximum ventilation clears dust and fumes. During leveling compound cure, moderate ventilation prevents too-slow or too-fast surface drying. The approach: ventilate heavily during prep work, then reduce to moderate airflow during cure.
Sunlight and direct heating: sunlight through windows creates hot spots on the floor. Leveling compound in direct sun can cure faster than compound in shade, creating uneven cure and potential bond or surface quality issues. The solution: shade windows during leveling and early cure (cardboard or temporary coverings), or schedule work when direct sun isn't hitting the floor.
Construction activity: other trades working in the space during leveler cure create multiple problems. Foot traffic before full cure can mark the surface or cause bond disturbance. Dust from other work settles on curing leveler, creating surface contamination that affects finished flooring installation. Temperature changes from opening doors and windows affect cure. The ideal: leveler goes down as the last trade before flooring installation, with the space sealed and maintained at stable conditions during cure.
The environmental control period starts when primer goes down and continues through leveler cure. For typical leveling compounds, this is 24-48 hours. The space needs to be kept at proper temperature, protected from contamination, and free from disruptive activity. This coordination matters in construction schedules—other trades need to be sequenced around the leveling work, not concurrent with it.
Timeline and Sequencing Reality
Surface preparation isn't a single afternoon's work—it's a sequence of steps with required waiting periods between them. The realistic timeline for proper preparation:
Day 1: Moisture testing begins (probes need 24-72 hour equilibration time). Surface profile creation (grinding/shot blasting). Initial cleaning (vacuuming). If moisture test results come back high, the project pauses here for concrete drying or moisture mitigation.
Day 2: Crack assessment and filling (filler needs cure time before leveling—usually 24 hours minimum). Final cleaning (vacuuming and damp mopping). Contamination removal if identified.
Day 3: Primer application (after ensuring floor is clean and dry). Leveling compound application (within primer recoat window).
Day 4: Leveling compound cure continues. No traffic, maintained environmental conditions.
Day 5+: Full cure (varies by product—some allow foot traffic at 4 hours, full cure at 24 hours; others need 48-72 hours before traffic). Finished flooring can be installed per leveler manufacturer's recommendations.
This timeline assumes good conditions and no complications. Complications that extend timeline: high moisture test results requiring drying time, extensive contamination requiring aggressive removal, large crack filling needing extended cure, cold weather requiring heating before application.
The compressed timeline temptation: skip moisture testing (risk failure), combine cleaning and priming on same day (risk insufficient drying), apply leveler immediately after grinding without proper cleaning (risk bond failure). These shortcuts reduce preparation time from 3-4 days to 1-2 days but increase failure probability significantly.
Commercial flooring contractors building schedules around leveling work typically allocate 5-7 days from start of preparation to readiness for finished flooring. Residential work can sometimes be compressed to 3-4 days if conditions are ideal and area is small. The timeline variability comes from drying times (after cleaning, after primer) which depend on temperature, humidity, and ventilation—these can't be predicted perfectly in advance.
What Actually Gets Skipped and Why It Fails
The preparation steps have different skip rates in field practice:
Surface profile creation: skipped in approximately 30% of installations based on contractor surveys. The reasoning: "the concrete looks rough enough." The failure rate when skipped: 40-60% delamination within the first year. This is the most commonly skipped step that causes the most failures.
Contamination testing and removal: skipped in approximately 40% of installations. The reasoning: "the floor looks clean." The failure rate: heavily dependent on actual contamination present—clean floors show 5-10% failure, contaminated floors show 60-80% failure. The problem: contamination isn't always visible.
Moisture testing: skipped in approximately 50% of installations. The reasoning: "the concrete is old and looks dry." The failure rate: depends on actual moisture levels—dry slabs show minimal additional failure, wet slabs show 70-90% failure. Unknown moisture status creates unknown risk.
Crack treatment: skipped for hairline cracks (acceptable), often skipped for small cracks that should be treated. The failure result: telegraphing through leveler (cosmetic issue, not bond failure). Failure rate for untreated cracks over 1/16": approximately 80% telegraph through.
Thorough cleaning: rushed or incomplete in approximately 60% of installations. The reasoning: "it's clean enough." The failure rate: 20-30% bond issues from dust contamination. Less catastrophic than skipped profile creation but still causes callbacks.
Primer application: skipped in approximately 20% of installations. The reasoning: "the leveler manufacturer says primer is optional." The failure rate: increases delamination risk by 30-40%, particularly in marginal bond conditions.
The pattern is clear: the steps that get skipped most often (contamination removal, moisture testing, thorough cleaning) are the least visible but still cause significant failures. The step that seems most obvious (surface profile creation) gets skipped frequently despite being critical.
The economic pressure: proper preparation adds 1-3 days to the project timeline and costs $1-3 per square foot in materials and labor. Skipping preparation saves that time and cost upfront but creates failure risk worth far more. A typical residential leveling job might be 500 square feet at $5 per square foot ($2,500 total). Proper preparation adds $500-1,500 to that cost. Failed installation requires complete removal and reinstallation: $5,000-7,500. The math favors preparation overwhelmingly, but the cost is upfront and certain while the failure risk is future and probabilistic—human nature favors saving the certain cost despite the risk.
The Professional Reality
Flooring contractors divide into two categories: those who prepare properly and those who cut corners. The corner-cutters get away with it most of the time—maybe 60-70% of cut-corner installations succeed anyway because conditions happened to be favorable. The 30-40% that fail create callbacks, warranty claims, and reputation damage that far exceeds the money saved by cutting corners.
The contractors who prepare properly have failure rates under 5%. These aren't zero-failure operations—nothing is—but the failures that occur are random or from conditions that couldn't be predicted, not from skipped preparation.
The interesting data point: proper preparation doesn't take dramatically more time than corner-cutting. The time difference between "quick cleaning" and "thorough cleaning" is 30-60 minutes. The time difference between "looks good enough" surface profile and "measured and verified" profile is the 10 minutes to check with CSP chips. The difference between skipping moisture testing and performing it is the $100-200 material cost and the 3-day wait for results—the labor time is minimal.
The preparation workflow that delivers consistent success:
- Moisture test immediately (get the 3-day clock started)
- Surface profile creation (grinding) with dust extraction
- Vacuum thoroughly, then damp mop, then vacuum again after drying
- Identify and mark all cracks, then fill and grind flush
- Verify cleanliness (white cloth test) and profile (CSP chips)
- Prime at proper timing
- Level within primer recoat window
- Protect during cure
This sequence takes 3-4 days elapsed time (mostly waiting for drying and curing) and perhaps 6-10 hours of actual labor for a typical residential room. The rushed sequence (skip moisture test, quick grinding, minimal cleaning, no crack filling, skip primer) takes 1-2 days elapsed time and perhaps 3-4 hours labor. The time saved: 2 days elapsed, 3-6 hours labor. The risk increase: failure probability goes from under 5% to 30-40%.
For homeowner DIY installations, the preparation challenge is different: not economic pressure but knowledge and equipment. Most homeowners don't own concrete grinders, don't have moisture testing equipment, and don't know what CSP ratings mean. The accessible approach: rent the grinder ($75-150), buy moisture test kit ($30-50), and follow the preparation sequence carefully. The time investment is higher for inexperienced users (maybe 12-15 hours labor instead of 6-10), but the cost is similar and the failure risk is equivalent to professional work if the steps are followed.
The tools used for preparation connect to broader equipment decisions—the impact driver vs drill comparison becomes relevant for concrete fastening during crack repair, and the Milwaukee vs DeWalt tool selection affects whether battery platforms work across preparation equipment and other construction tools.
When Preparation Can Be Simplified
Not all leveling jobs require maximum preparation intensity. The conditions that allow simplified preparation:
New concrete (properly cured, never sealed, no contamination): often already at adequate surface profile, needs only cleaning and moisture verification. Can sometimes skip grinding if CSP checks adequate.
Small areas (under 50 square feet): moisture testing might use less expensive test methods, grinding might be done with handheld tools rather than renting walk-behind equipment.
Thin applications (under 1/4"): have less stress at the bond line, more forgiving of marginal preparation. Still need profile and cleanliness but primer becomes more optional.
Low-risk uses (utility areas, spaces where delamination wouldn't cause significant problems): might accept higher failure risk to save preparation cost.
The conditions that demand maximum preparation:
Large areas: the larger the area, the more critical consistency becomes. Small patches of inadequate preparation in a large floor create localized failures that are expensive to repair.
Thick applications (over 1/2"): create more stress at the bond line, less forgiving of preparation shortcuts.
High-traffic or high-load floors: need maximum bond strength, can't tolerate any preparation compromises.
Floors going under expensive finished flooring: delamination under tile or wood flooring requires removing the finished flooring to repair the leveler—extremely expensive. These installations demand maximum preparation to minimize risk.
The decision framework isn't "can I skip this step" but rather "what's the consequence if this step wasn't needed but I did it anyway" versus "what's the consequence if this step was needed but I skipped it." Unnecessary preparation wastes time and money. Skipped necessary preparation causes failures. The cost of unnecessary preparation is usually $100-500 and 1-2 days. The cost of failed leveling is $1,000s and weeks. The risk/reward calculation favors over-preparation.
Frequently Asked Questions
How long does concrete need to dry before self-leveling?
New concrete needs minimum 28 days to reach structural cure before leveling. However, structural cure doesn't mean dry enough for leveling—moisture testing determines readiness. Moisture emission must be below 3 pounds per 1,000 square feet per 24 hours (calcium chloride test) or below 75% relative humidity (in-situ probe test). The drying timeline varies dramatically: concrete on vapor barrier in dry climate might be ready at 28 days, concrete on grade in humid climate might need 60-90 days or longer. Existing concrete that's been in service for years isn't automatically dry—ground moisture can keep slabs-on-grade damp indefinitely. The only reliable determination is actual testing, not time-based assumptions. Concrete that feels dry to the touch can still fail moisture testing—surface dryness doesn't indicate internal moisture levels.
Can you grind concrete yourself or do you need a professional?
Concrete grinding is physically demanding but not technically complex—homeowners can do it with rented equipment. Walk-behind concrete grinders rent for $75-150 per day and handle residential room-size areas. The work requirements: dust management (HEPA vacuum rental adds $40-75 per day), hearing protection, eye protection, and physical stamina (the equipment weighs 100-300 pounds and requires controlling during operation). The learning curve is minimal—most users become proficient within 30 minutes. The challenges: maintaining even pressure for consistent profile, managing dust (the equipment generates enormous amounts without proper dust collection), and accepting the time requirement (200-400 square feet per hour depending on concrete hardness and desired profile depth). Professional grinding makes sense for large areas (over 1,000 square feet), situations where dust control is critical (occupied buildings), or when time pressure exists. DIY grinding makes sense for smaller areas where equipment rental cost ($150-200 for grinder and vacuum) is significantly less than professional service ($2-4 per square foot, so $200-400 for 100 square feet).
Do you need to acid etch concrete before self-leveling?
Acid etching alone rarely creates adequate surface profile for reliable leveler bonding. The process (muriatic acid diluted 3:1 to 4:1, applied to wet surface, allowed to react, then neutralized with water) creates CSP-1 to CSP-2 profile at best—the low end of the acceptable range. Mechanical preparation (grinding, shot blasting) reliably creates CSP-2 to CSP-4 profile—the middle of the acceptable range—and provides more consistent results across the surface. Field performance data shows higher delamination rates with acid-etched surfaces compared to mechanically prepared surfaces. Acid etching sees use in situations where mechanical equipment isn't accessible (small rooms, areas with limited access) or as supplementary treatment to mechanical prep (etch after grinding to ensure complete contaminant removal). The primary concerns with acid etching: inconsistent profile (hard aggregate doesn't etch, only cement paste does), disposal requirements (neutralized acid solution requires proper disposal), and safety (acid burns, fumes). For standard leveling preparation, mechanical methods are more reliable.
What happens if you don't prime concrete before self-leveling?
Skipping primer increases delamination risk by approximately 30-40% based on contractor experience data. The failure mechanism: unprimed porous concrete rapidly absorbs water from the leveling compound, creating two problems. First, it disrupts the leveler's water-to-powder ratio at the bond interface, affecting cure chemistry and bond strength. Second, it can cause surface drying before complete cure, potentially creating weak surface layer. The failure timeline: some unprimed installations fail within weeks (visible delamination), others take months (hollow areas detectable by tapping), and some succeed despite lacking primer (when concrete porosity happens to be low and surface profile is excellent). The success rate without primer drops from 95%+ with proper preparation including primer to approximately 60% without primer—still better odds than not creating surface profile, but notably worse than with primer. Some leveling compound manufacturers list primer as "recommended" rather than "required"—this means their product can work without primer under ideal conditions, but performance improves with primer. The primer cost (typically $15-25 per gallon covering 200-400 square feet) and application time (30-60 minutes for typical room) is small compared to the failure risk it mitigates.
How do you know if concrete has moisture problems?
Visual indicators suggest possible moisture issues: efflorescence (white crystalline deposits on surface), concrete that stays darker/damper than expected, existing coating delamination or blistering, visible water beading or pooling, or musty odor. However, these indicators aren't reliable—concrete can have moisture levels that cause leveler failure without any visible symptoms. The only reliable determination is testing: calcium chloride test (ASTM F1869) measures moisture emission rate, in-situ RH probe test (ASTM F2170) measures relative humidity within the slab. Both tests are standardized with specific procedures and acceptance criteria. The testing locations matter: 1-3 test locations per 1,000 square feet, with additional tests in suspect areas (near exterior walls, areas that were water-damaged). Test timing matters: testing must be done after surface preparation (grinding changes surface moisture characteristics) but before primer application. The test cost ($100-200 for typical residential room) is worthwhile even when moisture problems aren't suspected—discovering moisture issues after leveling creates expensive failures, while testing beforehand either provides confidence to proceed or identifies problems that need resolution before leveling.
Can self-leveling compound go over painted concrete?
The answer depends entirely on paint bond quality. Well-bonded paint (no peeling, no blistering, passes scratch test where it can't be easily scraped with putty knife) can sometimes be leveled over if properly primed with bonding primer. The logic: if the paint is well-bonded to concrete, and the leveler bonds well to the primed paint, the system can work. The risk: the paint-to-concrete bond becomes the weak point—leveler can only be as well-bonded as the material underneath it. Poorly bonded paint (any peeling, blistering, or areas that scrape easily) must be removed before leveling—the paint will delaminate, taking the leveler with it. The conservative approach: remove all paint before leveling regardless of apparent bond quality. The risk-tolerant approach: test paint bond carefully, remove any questionable areas, prime remaining paint with epoxy bonding primer, then level while accepting slightly elevated failure risk. Commercial installations almost always remove paint—the failure risk isn't worth it when business operations or expensive finished flooring are involved. Residential installations sometimes level over paint successfully, but success rate decreases compared to leveling over clean concrete.
Why does self-leveling concrete crack?
Self-leveling compound cracks for several reasons: insufficient or excessive thickness (most products have minimum and maximum thickness specifications—outside this range, cracking increases), rapid drying (causes surface shrinkage faster than interior, creating surface tension cracks), poor substrate bond (allows movement between leveler and substrate, creating stress cracks), substrate cracks telegraphing through (concrete cracks underneath transmit to leveler above), structural substrate movement (settling, deflection under load), or improper mixing (wrong water-to-powder ratio affects cure chemistry and strength). The crack prevention approach: follow thickness specifications exactly, maintain proper cure conditions (avoid rapid drying from excessive heat or ventilation), ensure proper surface preparation for maximum bond, treat substrate cracks before leveling, verify substrate structural adequacy, and mix to exact specifications. The crack appearance timeline varies: mixing errors cause early cracking (within hours to days), bond failures cause cracking within weeks to months, and substrate issues cause cracking on variable timeline depending on substrate movement patterns. Some surface crazing (fine hairline cracks) is cosmetic and doesn't affect performance—these appear from minor surface shrinkage during cure. Deep cracks (those penetrating through the leveler thickness) indicate more serious issues requiring investigation.
How thick can self-leveling concrete be poured?
Product specifications vary, but typical self-leveling compounds allow 1/8" to 1" in single pour. Thinner than 1/8" risks incomplete coverage and feathered edges that fail. Thicker than 1" risks incomplete cure (the interior may not cure properly), excessive shrinkage cracking, and bond failure from weight stress. Applications requiring more than 1" depth need multiple pours: pour to maximum thickness, allow complete cure (typically 24-48 hours), then pour additional layer to final thickness. The multi-layer approach requires surface preparation between layers—the second pour must bond to the first pour, which means the first layer needs light scarifying or grinding, cleaning, and priming just like the original concrete substrate. Some products specifically formulated for thick applications allow single pours up to 2-3", but these specialty products cost more and have longer cure times. The thickness consideration connects to substrate flatness: severely uneven substrates requiring significant thickness to level might need alternate approaches (grinding high spots before leveling, or concrete topping rather than self-leveling compound). The concrete self-leveler selection factors in thickness requirements along with other performance criteria.
What's the difference between self-leveling concrete and concrete resurfacer?
Self-leveling compound is fluid, flows to level under gravity, and is designed for interior applications creating smooth, flat surfaces for finished flooring installation. Typical thickness range is 1/8" to 1", application is poured and lightly spread, and primary purpose is leveling uneven substrates. Concrete resurfacer is thicker consistency (similar to mortar), doesn't self-level (requires troweling), and works for both interior and exterior applications creating durable wearing surfaces. Typical thickness range is 1/4" to 2"+, application is troweled, and primary purpose is repairing damaged concrete or creating decorative surfaces. The material formulations differ: self-leveling compounds use finer aggregates and flow additives for fluid consistency, resurfacers use coarser aggregates and higher strength formulations for durability. The applications rarely overlap: use self-leveling for interior floor preparation under finished flooring, use resurfacer for exterior concrete repair or interior floors that will remain exposed. Using self-leveling compound outdoors typically fails—it's not formulated for weather exposure. Using resurfacer for indoor leveling is unnecessarily expensive and doesn't create the smooth surface needed under finished flooring.
How long before you can walk on self-leveling concrete?
Product specifications vary widely: rapid-cure formulations allow foot traffic in 2-4 hours, standard formulations need 4-6 hours, and some need 12-24 hours before walking. These times assume proper cure conditions (temperature 65-75°F, moderate humidity, good ventilation). Cold temperatures extend walk-on time significantly—at 50°F, products might need double the normal time. The walk-on time is when foot traffic won't damage the surface, but this doesn't mean full cure. Full cure (when the leveler reaches maximum strength and finished flooring can be installed) typically requires 24-72 hours depending on product and conditions. Heavy traffic, wheeled equipment, or point loads shouldn't occur until full cure. The cure time extends with thickness—thick applications cure slower than thin. Moisture-sensitive finished flooring (wood, laminate) needs the leveler to be fully cured and dry before installation—this can take 3-7 days or more depending on thickness and ventilation. The technical data sheet for the specific product provides authoritative timing—these general ranges vary by manufacturer and formulation. The temptation to rush cure times by adding heat or excessive ventilation creates problems: too-rapid surface drying can cause surface weakness or cracking. The reliable approach: follow manufacturer specifications exactly and verify readiness before proceeding to next steps.
Related Concrete and Flooring Topics
The preparation tools and techniques connect to broader concrete work patterns. Understanding what a bull float is used for and what a darby tool is explains how concrete finishing affects the surface you're preparing—power-troweled surfaces that look smooth actually need aggressive preparation, while float-finished surfaces might already have adequate texture. The magnesium float vs steel trowel choice during original concrete placement determines initial surface porosity and texture.
For spaces where the best shed for riding lawn mower storage connects to floor preparation—many people level shed floors to create better storage conditions. The shed foundation cost and preparation principles mirror floor preparation requirements: proper substrate preparation prevents long-term problems regardless of scale.
The tool decisions for preparation work tie to equipment platforms. Comparing Milwaukee vs DeWalt matters when concrete drilling or fastening is required during crack repair. The impact driver vs drill distinction affects which tool handles concrete fasteners efficiently. And the brushless vs brushed motor tools comparison influences battery tool selection for preparation work requiring extended runtime.
The material degradation patterns discussed in posts like why pressure-treated lumber destroys saw blades or what MDF actually does to your tools parallel the chemical and mechanical processes causing concrete preparation challenges—moisture, contamination, and material chemistry drive outcomes in all construction applications.